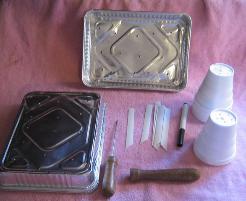
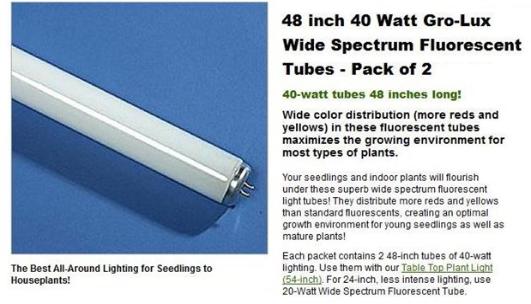
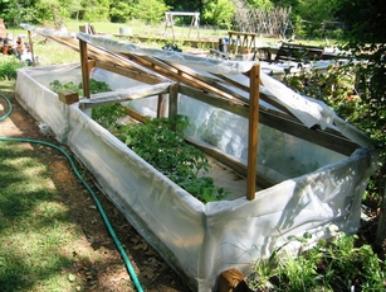
| The Secret to Starting a Garden Each Spring Dr. Neighbors provides garden plants as encouragement to consider the health benefits of a personal garden that can include the nutrition of natural foods along with the opportunity for a relaxing hobby. If you were curious where Dr. Neighbors gets these plants you may enjoy the article that follows about how the plants were grown. The short explanation is that Dr. Neighbors' husband has a sister that raises these plants at her home in New Hope, Alabama. For those interested in raising garden plants read on. Starting Your Own Vegetables & Flowers from Seed (Originally Presented by Jean Mann, Mar 15, 2013) To get started, you will need to assemble several items. 1. Your selection of seeds 2. Alabama Planting Guide 3. Soilless seed starter medium or soilless potting soil. 4. Slow release fertilizer, pelletized lime 5. Fungicide 6. Seed starting trays and pots 7. Labels and water proof pen 8. Light stand for germination. 9. Cold Frame or Greenhouse Always get your seeds from a reliable source so that you know they are for the current year. You do not want to lose planting time by getting cheap seeds that do not have good germination. Good seed companies such as Parks, Burpee, Gurney, etc are good choices. Some local seed stores may also provide current year seeds. I have found that I can carry over seeds not used by storing them in my freezer. They will lose some viability, but I may still be able to sprout enough for my needs. To be successful, you will want to know the planting dates for Alabama. By starting early, it is possible to have both a Spring and a Fall garden. The Alabama Extension Service has a planting guide at the following website. http://www.aces. edu/pubs/docs/A/ANR-0063/ANR-0063.pdf We are very fortunate to have a nice long growing season in Alabama. We can usually plant almost everything by April 15 in Alabama. Many cool weather varieties such as onion, radish, English Peas, collard, spinach, broccoli, lettuce, Brussels sprouts, etc can be planted earlier. Plants will help you get an early start, but you can also start you own plants from seeds. Some plants need to be started from seed and transplanted. Tomatoes, peppers, eggplant, herbs, and flowers will need to be started this way. Larger seeds such as squash, cucumbers, melons, pumpkins, and gourds should not be transplanted. They can however be start in small pots to get an early start and planted with the root ball intact directly in to the ground. To have tomato plants ready to be in the ground by April 15, you need to plan to start the seeds about eight weeks earlier. You will need to allow two weeks for germination and growing big enough to transplant. The little plants will need to grow about six to eight weeks in the pots to be about six to eight inches tall. When they are finally planted in the ground, the little tomatoes plants need to be planted such that only the top leaves are above ground. This will again allow all of the stem underground to become part of the root system. When planting in your garden, you will want to add some more fertilizer, lime and a couple of tablespoons of Epsom Salt to each plant. Pepper plants and eggplants need warmer weather, so they will not grow very fast in cold frames in the cooler March time frame, but will begin to grow faster as the warmer April and May comes along. Start those plants a little later, around the middle of March and the will be good to plant in the ground around the first of May. Any flat shallow pan with drain holes can be used to start seeds that will need to be transplanted. For years I have used aluminum brownie pans with holes punched with my ice pick for my seed starter pans. I start with clean ones every year so I do not have to wash them or take a chance of carrying over disease problems from using last year’s pans. There are many types of pots that can be used. After washing pots for many years, I now use small Styrofoam coffee cups for my starting post for transplanted plants and seeds that that are not transplanted. I again use my ice pick to punch about five holes in the bottom to give drainage, then I just throw them away when finished planting. Below are some pictures of seed starting supplies, my light stand, and the little tomato seeds that I have just started. I expect to be transplanting them about two weeks after they have been started. Light Stand for Germination: You will need a way to keep the seeds warm and moist while germinating. You can purchase a warming mat and a great many varieties of light stands and they work well. I have, however, made my own light stand for germination. I started with a storage shelf like you can purchase at Lowes and put a 4-ft two bulb shop light under the two top shelves. I use the lower shelves for storage. I use one Growlux bulb and one Daylight Bulb on each shelf. The examples below are from the Parks seed catalog, but you can purchase these type light bulb many other places like Lowes, etc. I have my light stand in my utility room in the house and no other heat is required for good germination. It is shown below. I put aluminum foil on each shelf so the water will not run down on the shelf below. I also put aluminum oven drip plans on the shelves to help contain any drainage. I drape a clear plastic covering over the light and shelf to hold in the warmth from the light and the moisture. The soil is kept watered and the lights on 24 hours a day until the little plants start coming up. Once the seeds have sprouted, the lights are turned off at night. Soilless Seed Starting Mix: There are several commercial sources of soilless seed starting mix. The benefit of using a seed starting mix is that it is ground finer than typical potting soil. If you prefer, you can make your own instead of buy a commercial mix. Seeds do not require any fertilizers until they produce their first set of “true leaves”. The first leaves that appear are called “seed leaves” or cotyledon leaves and serve the purpose of feeding the seedling until the first “true leaves” appear. • 1 part peat or coir (Coir is a sustainable peat substitute made from coconut husks. Peat is mined from marshland, destroying natural habitats. When you can, use coir.) • 1 part perlite (popped volcanic ash that creates good drainage.) • 1 part vermiculite (water absorbing material made from the mineral mica) Soilless Potting Mix: A soilless potting mix is preferable to using outdoor garden soil for several reasons. One is that there is more humus to hold moisture, but the most important reason is that it is a relatively sterile potting medium, meaning disease in insect free, so it does not have to be treated in any way. There are many good soilless mixes on the market. However if you need a large quantity of mix or have a need for a special blend, it is often easier to simply create your own potting mix. Here are some basic recipes to try and to improvise with. 4-6 parts Sphagnum Peat Moss 1 part Perlite 1 part Vermiculite Add ½ cup each per every 8 gallons of mix: ½ cup Bone Meal(Phosphorous) ½ cup Dolomite Limestone (Raises soil pH and provides calcium and magnesium) ½ cup Blood Meal or Soybean Meal or Dried Kelp Powder (Nitrogen) Slow Release Fertilize & Pelletized Lime: As mentioned above, the seed to be transplanted will not need any fertilizer until they are transplanted in to cups. A general purpose slow release fertilizer should be added to the potting mix before transplanting. That will give the little plants food for the first three months of growing, enough until they are planted in the garden. A small amount of pelletized lime is good to be added for tomatoes. More lime should be added in the garden where tomatoes will be planted. I put my potting soil mix in a five gallon bucket (like comes from Lowes paint department) add ½ cup of slow release fertilizer and ¼ cup of pelletized lime for tomatoes and stir it thoroughly. The potting soil needs to be dry so it will stir easily. I leave off the lime for other plants. To prepare the soil for planting, I add enough warm water to dampen the soil. This is usually about two to three quarts of water for the five gallon bucket of soil mix. The final mix should be damp enough to stick together when squeezed in your hand but not wet enough to squeeze out water. Transplanting and Soil Drench with Fungicide: When transplanting, do not fill the pot all the way to the top. Leave about ½ at the top to allow for watering so your soil will not wash out of the pot. When transplanting young plants (veggies or flowers), make a hole (you can use a pencil) deep enough to lower the entire stem down into the soil to just below the cotyledon leaves. This will allow the entire stem to become part of the root system. Handle the little plant gently since crushing the stem many damage the plant. It is suggested that you loosen the root with a tooth pick and lift the plant by the leaf into the hole you have made in the cup of potting soil. Press the soil gently to firm it around the plant. When you have filled a tray with newly potted plants, they will need to be watered to settle the soil around the roots. The first watering should be with water containing a fungicide. I like to use Captan 50. I usually have another five gallon bucket that I keep that water mixed up in. I use a small flower watering can to gently water around the base of each little plant. You will not need to water with a fungicide again after this first watering. Planting Seeds in Cups: When starting squash, cucumbers, melons, gourds, etc, I just fill the potting cups to about ½ inch from the top pressing gently (not packing it too hard). I put three seeds in each cup and press them under the soil about one inch. Then smooth and press the soil again. Those cups also get a watering of the Captan 50 water. Labels and Water Proof Pen: You will need some way to put a label in each pot. This is important since all tomato plants look the same. The same is true of pepper plants, etc. Whatever you use for labels needs to be something that water will not destroy. You can purchase labels or you can make your own. Recently I found that old plastic venetian blinds cut up and make very nice labels. You do need to purchase a water proof pen to use for writing on your labels. These water proof pens can be ordered through the seed catalogs I also found them at Lowes last year, similar to the one from the Parks catalog shown above. Do not use pencil, sharpies, or regular ink pens since they will eventually wash off. (Learned this from experience). Cold Frame or Greenhouse: The little pots of transplanted plants or planted seeds will need a protected place to grow outside. This is best done in a Cold Frame or Greenhouse that can have a little heat added when the nights or days get cool. I use Cold Frames that I cover each year with 6 mil plastic (any less thickness will not hold up to the wind). Sunlight deteriorates the plastic so it must be replaced every year. The sunlight needs to be able to come through and the temperature needs to be cool enough such that the little plants can grow strong and sturdy and ready to move to the garden when the time is right. On sunny days, some ventilation will be needed and on colder nights when it gets down in the lower 40’s or 30’s or close to freezing, a small amount of heat will be required. Growing in full sunlight with the normal spring temperatures will make strong plants ready to go in the garden. The cold frames that I have used for many years are pictured below. They are built out of treated wood so they have lasted well. They only require new plastic every spring which must be removed in the fall since it is not UV resistant and begins coming to pieces by the middle of the summer. Two of my cold frames are connected so that I can put a small electric ceramic heater in it on those cold nights when the temperature will be getting too low. They have legs to raise the covers as shown in the picture for nice days or for access. The legs are long enough to also raise them about six inches for ventilation on cooler but sunny days or when it is raining. The cover also helps protect the little plants from getting damaged from wind or heavy rain. The tops are always closed at night and opened again in the morning, relatively early, on sunny days for ventilation and to allow moisture to get out. The tops must be opened either to the six inch level or fully on sunny days. On days of continuous rain, the top can be kept closed or opened to the six inch level. You can see in the picture the back is higher than the front by about six inches to allow for better rain runoff. You will need to make sure the little plants are watered as needed. This will need to be done everyday especially as the plants get larger. Also, make sure you do not over water the plants when they are small especially on cloudy days. I use a small hand watering pitcher when the plants are small to make sure that I can control the amount of water and do not disturb the little plants as they are establishing their root system in the cups. As the plants grow and become larger, more water will be needed. The slow release fertilizer added in the soil initially should be sufficient to last until they are planted in the ground. Additional fertilizer would make them grow too large for the cups they are planted in. Both Organic and Inorganic Ingredients Serve to Create a Soilless Potting Mix The following is some information I found on the Internet that will help you understand about the ingredients in soilless potting mix. Organic ingredients hold water and nutrients Some organic ingredients, such as peat moss, provide needed water-holding capacity, and others like pine bark, can lend a porous structure to avoid compaction. Peat moss: The physical and chemical properties of peat moss make it an ideal base for most soilless mixes because it can hold both water and air. It’s light, but its fibrous structure allows it to hold 15 to 20 times its weight in water. The peat fibers also give it a large amount of pore space (80 to 90 percent of its total volume). It holds nutrients well, and it readily shares them with the roots, thanks to its slightly acidic pH. Horticultural- grade peats come from the decomposed remains of sphagnum moss species that have accumulated over centuries in peat bogs. They are not a renewable resource, however, and concerns about the sustainability of harvesting this product is a common topic of discussion among gardeners. Another type of peat that is used in soilless mixes is known as reed-sedge peat, but this material is generally inferior to sphagnum peat. Composted pine bark: This material is a renewable resource and is one of the most widely used components in commercial container media, although barks from many other species are also processed for this purpose. Bark lacks the moisture-holding capacity of peat moss, but it can dramatically increase the porosity of a mix. Bark particles used in container media generally range in size from dust like to about 3/8 inch in diameter. Coir: Another renewable organic material is coir, a derivative of coconut hulls that shows promise as a peat substitute. Coir has exceptional water-holding capacity, and when mixed with pine bark, it can eliminate or substantially reduce the need for peat moss in a mix. Other sources of organic matter that can be used in soilless mixes include composted manures, leaf mold, and crop residues such as rice hulls. Inorganic ingredients improve drainage and add weight Inorganic ingredients improve drainage and add weight Inorganic ingredients like sand, vermiculite, and perlite generally lend porosity to a mix, but they can also help retain moisture and add weight or density. Sand: This material can add needed weight to peat- and bark-based mixes and fill large pore spaces without impairing drainage. Coarse sand is preferred in most cases, and sand ground from granite is used in the best mixes. Fine sand with rounded grains like that found at the beach can actually reduce drainage when used in excessive amounts. Also, remember to use clean sand since it can be a source of disease if used from your yard. Vermiculite: A mineral that has been heated until it expands into small accordion-shaped particles, vermiculite holds large amounts of both air and water. But it can easily be compacted, so avoid packing down mixes containing large quantities of it. Vermiculite can also retain nutrients and help a mix resist changes in pH. Perlite: One of the more common ingredients in commercial potting mixes, perlite is an inert ingredient manufactured by heating a volcanic material to produce lightweight white particles. It promotes good drainage while holding nearly as much water as vermiculite. Other inorganic materials that are useful in potting media include polystyrene (plastic) beads and calcined clay, which is similar to kitty litter. Plastic beads are inert and serve only to promote drainage, but calcined-clay particles can actually improve the moisture- and nutrient-holding capacity of a mix. The ideal mix: Generally, most container plants will thrive in a mix that contains about 40 percent peat moss, 20 percent pine bark, 20 percent vermiculite, and 20 percent perlite or sand. Remember both peat moss and pine bark will make soil that tends towards being acidic which will be great for acid loving plants, but you may need to add some pelletized lime for nonacid loving plants. For more information about Jean Mann, the author of this article, visit her at the Gourd Art Enthusiasts website dedicated to gourd crafters, artists and gourd art fans For more gardening resources in the Huntsville, Alabama area click here. |